Twitter Tips--Finding someone on another network


twitter tips,twitter tricks,twitter tips and tricks,twitter latest updates,facebook tips and tricks
Finding someone on another network

Searching for the members of your posse individually using the Find on Twitter feature is an easy way to get going, but it can be time-consuming and frustrating if you keep coming up empty. An often better way to go is to get Twitter to do some of the legwork for you. 

Specifically, you can tell Twitter to rummage through your list of contacts on your Gmail, Yahoo!, AOL, Hotmail, or MSN account. If Twitter finds one or more tweeters, it displays them in a list.

Follow these steps to give this a whirl:

 1.  Sign in to your Twitter account.

 2.  Click Find People. The Find People page appears.

3.  Click the Find on other networks tab.

 4.  Click the network you want to scour: Gmail, Yahoo, AOL, Hotmail, or MSN.

 5.  Type the e-mail address and password for that account.

6.  Click Continue. Twitter connects to your account, downloads your contacts list, and then checks for matches in the Twitter database. If it finds any, it displays them in a list and selects the check box beside each person by default.

7.  If there are any people you don’t want to follow, deselect the check box beside each of those people.

 8.  Click Follow. Twitter displays the Why not invite some friends? page, which lists all your contacts who don’t have a Twitter account. You can use this list to extend invitations to one or more contacts to join Twitter.

9.  Select the check box beside each person you want to invite.

 10.  Click Invite. Twitter fires off an e-mail message to each person.


Reference : wiley.com

Twitter Tips--Finding people with Twitter accounts


twitter tips,twitter tricks,twitter tips and tricks,twitter latest updates,facebook tips and tricks
Finding people with Twitter accounts

The best way to get started is to use the Find on Twitter feature, which enables you to scour the database of tweeters for someone you know. You can search by first name, last name, or even the person’s Twitter username. 

Here’s how it works:

 1.  Sign in to your Twitter account.

 2.  Click Find People. The Find People page appears.

 3.  Click the Find on Twitter tab.

 4.  Use the text box to type the name (first or last or both) of the person you’re looking for.Using both first and last names is usually the way to go here.If that doesn’t work, use just the last name or the first name, whichever is more unique. If all you have is a partial username, you can enter that instead.

 5.  In the search results, click the person’s avatar or username to check out their profile.


Reference : wiley.com

Twitter Tips--Getting an e-mail receive a direct message in Twitter


twitter tips,twitter tricks,twitter tips and tricks,twitter latest updates,facebook tips and tricks
Getting an e-mail receive a direct message in Twitter-If someone you’re following replies to one of your updates, then you see that reply in your friend timeline, but for all other replies you must open the @Replies section of your home page. However, direct messages never appear in your time lines, so you must sign in to Twitter to see them.


That’s a hassle, but luckily it’s possible to configure your Twitter account to forward direct messages to your e-mail address. This option is turned on by default in new Twitter accounts, but it’s worth following these steps to make sure:

 1.  Sign in to your Twitter account.

 2.  Click Settings.

 3.  Click the Notices tab.

 4.  Select the Email when I receive a new direct message check box.

 5.  Click Save. Twitter updates your account with the new setting.


Reference : wiley.com

Twitter Tips--Making private updates in twitter


twitter tips,twitter tricks,twitter tips and 

tricks,twitter latest updates,facebook tips and tricks
Making private updates in twitter. A default Twitter account is pretty much an open book:

A--Anyone (even people without a Twitter account) can access your home page and view your tweets.

 B--Each time you post a tweet it appears briefly on Twitter’s public timeline for all the world to see.

C--Anyone with a Twitter account can follow your updates.


Most Tweeters are fine with this, but you might prefer a less open approach. If so, you can configure your Twitter account to protect your updates. This means your account is much more private:

  A--Only people who follow you can access your home page and view your tweets.

  B--Your tweets never appear on Twitter’s public timeline.

 C-- People who want to follow you must send a request, and you can then either approve or decline that request.

If you like the sound of all that, here are the steps to follow to protect your updates:

 1.  Sign in to your Twitter account.

 2.  Click Settings. The Settings page appears.

 3.  Click the Account tab.

 4.  Select the Protect my updates check box.

 5.  Click Save. Twitter updates your profile to protect your updates.


Reference : wiley.com

Twitter Tips--Working with Updates Deleting,Adding

twitter tips,twitter tricks,twitter tips and tricks,twitter latest updates,facebook tips and tricks
Once you’ve begun posting updates in earnest, you may find that you need to perform a little maintenance work from time to time. Twitter does not offer many options in this department, but there are three things you can do: delete an update, mark an update as a favorite, and make your updates private. The next three sections take you through the details.

Deleting an update in Twitter

One of the unusual and occasionally frustrating quirks of Twitter is that your tweets aren’t editable.Once you click the Update button, your post gets shipped out to all your friends and what they see is what you sent.

If you misspelled a word, made some egregious grammatical gaffe, or forgot to include an address or some other crucial bit of data, too bad; the flawed tweet remains in the Twitter sphere for all to see.

When they make a major mistake in an update, most Tweeters simply send a fresh copy of the tweet with the corrections made (and,if possible,a brief note about what was corrected).

Still,that error-filled tweet remains in the timeline. What to do? The one thing that Twitter does allow you to do is delete a tweet. This removes the tweet not only from your profile page (which lists all your tweets), but also from the timelines of everyone who follows you.

twitter tips,twitter tricks,twitter tips and tricks,twitter latest updates,facebook tips and tricks


Here are the steps to follow to delete an update:

 1.  Sign in to your Twitter account.

 2.  Click Profile. Twitter displays a list of yourrecent      tweets.

 3.  If you don’t see the tweet you want to remove, scroll down to the bottom of the page and click    Older. Repeat this until you find the update.

 4.  Move the mouse pointer over the tweet text. As you can  see in figure 3.3, the Delete this update icon
     (a garbage can) appears to the right of the tweet.

5.  Click the Delete this update icon. Twitter asks you to  confirm the deletion.

 6.  Click OK. Twitter removes the tweet from your profile page, as well as from the home pages of all of your followers.

Adding an update to your favorites in Twitter

Twitter saves copies of all your updates on your profile page. The most recent 20 tweets appear on the main profile page (log in to your account and click Profile). To see earlier tweets, click the Older link at the bottom of the page, and then you keep clicking Older to go farther back in your update 
history.

This is fine if you only check out your previous tweets from time to time. However, you might occasionally post an update that contains something really useful that you want to access 
frequently, such as a Web site or a quotation. In that case, it can be a real pain to always have to dig back through your tweets to find the update you’re looking for. 

To work around this problem,Twitter lets you save that tweet as a favorite, and you can access it quickly by clicking the Favorites link that appears on both your home page and your profile page.

twitter tips,twitter tricks,twitter tips and tricks,twitter latest updates,facebook tips and tricks


Here are the steps required to save one of your tweets as a favorite:

 1.  Sign in to your Twitter account.

 2.  Click Profile. Twitter displays a list of your recent tweets.

 3.  If you don’t see the tweet you want to save as a favorite, scroll down to the bottom 
of the page and click Older. Repeat this until you find the update.

 4.  Move the mouse pointer over the tweet text. As you can see in figure 3.4, the Favorite this update icon (a star) appears to the right of the tweet.

 5.  Click the Favorite this update icon. Twitter adds a copy of the tweet to your Favorites list.

Twitter also changes the Favorite this update icon to an orange Un-favorite this update icon. As you’ve no doubt guessed, you click this icon when you no longer want to store a tweet in your Favorites list.


Reference : wiley.com


Twitter tips--Typing non-standard characters in Twitter


Typing non-standard characters in Twitter,twitter tips,twitter tips and tricks,fb tips,facebook tips,facebook tips and tricks,digg tips
Typing non-standard characters in Twitter Besides the keys that you can eyeball on your keyboard, you can also include in your tweets a few non-standard characters, such as and ™. 

Twitter supports a character set called UTF-8,which is a list of 400 symbols, from the usual alphanumeric suspects to currency symbols, math operators, foreign characters, and more. presents a few useful characters and their corresponding codes.

Characters You Can Use In Your Twitter Posts

Character Code Character Code

€       Alt+0128                                    ®        Alt+0174

…     Alt+0133                                      ±       Alt+0177

•       Alt+0149                                       ²       Alt+0178

™     Alt+0153                                       ³       Alt+0179

¡       Alt+0161                                       1/4    Alt+0188

¢      Alt+0162                                      1/2     Alt+0189

£      Alt+0163                                       3/4    Alt+0190

¥      Alt+0165                                       ×       Alt+0215

©    Alt+0169                                        ÷        Alt+0247

To type one of these characters, hold down Alt and type the four-digit code using your keyboard’s 
numeric keypad.Alternatively, use the Character Map application in Windows:

 1.  Choose Start ? All Programs ? Accessories ? System Tools ? Character Map. The Character Map window appears.

 2.  Double-click the symbol you want to use. Character Map adds the symbol to the Characters to copy text box.

 3.  Click Copy. Character Map copies the character to the Clipboard.

4.  Switch to your Web browser and position the cursor within the Twitter text box at the position you want the character to appear.

 5.  Press Ctrl+V. Windows pastes the character into the text box.

Reference : wiley.com

Twitter Tips- for managing the 140-character limit


Twitter Tips for managing the 140 character limit,twitter tips,twitter tips and tricks,fb tips,facebook tips,facebook tips and tricks,digg tips
Twitter Tips for managing the 140-character limit If there’s one thing that even many non-tweeters know about Twitter it’s that its messages can be no more than 140 characters long. Why 140 and not, say, 200, or 500, or no limit at all? Twitter was designed originally to use the Short Message Service (SMS) to send out its updates, and on the majority of SMS systems at the time, each message was limited to 160 characters. Twitter’s messages had to tack on the username at the front (which can be up to 15 characters long), so it 
chose 140 characters as the limit for a Twitter update.

Of course, knowing why you’ve only got 140 characters to express your thoughts is one thing, but actually shoehorning that thought into such a tiny space is quite another. Fortunately, with a bit of practice you’ll find yourself getting remarkably adept at crafting 140-words-or-less gems. To help you get there, here are a few pointers to bear in mind when composing your updates:

  Take advantage of the symbol short forms that are built in to the language. Use & or + instead of “and,” $ instead of “dollars,” % instead of “percent” or “percentage,” and so on.Use common abbreviations. E-mail, chat, instant messaging, and other forms of Internet communication have created a wide variety of abbreviations and acronyms, many of which are in common use: BTW (by the way), FYI (for your information), LOL 
(laughing out loud), and TTYL (talk to you later). Don’t hesitate to use these and other familiar short forms to save characters.

  Find shorter words. If there’s a key to winning the battle with the 140-character limit, it’s this: if a word has a shorter synonym, use the synonym. Delete “perturbed” and replace it with “mad”; get rid of “therefore” and use “so,” instead; replace “supercalifragilisticexpialidocious” with “cool.”

 Avoid redundancy and wordiness. If you’re bumping up against the 140-character ceiling, cast a critical eye over your text and ruthlessly rewrite passages that are redundant or that use more words than necessary. For example, use the Delete key to change “in the vicinity of” to “near” and trash “at this point in time” in favor of “now.”

Reference : wiley.com

Twitter tips--Sending an Update in twitter


Sending an Update in twitter,twitter tips,twitter tips and tricks,fb tips,facebook tips,facebook tips and tricks,digg tips
Sending an Update in twitter There are a few folks with Twitter accounts who are “read-only” users: they follow others, but they don’t post any updates themselves. That’s fine, I guess, if you’ve simply got nothing to say, but few of us are that tongue-tied. I assume you signed up with Twitter because you’ve got some things to 
share, so the next few sections take you through a few ways that you can do just that.

Before you get to that, you may be wondering exactly what you should be posting. Are there any rules, official or unofficial, for the type of content that you can send? Fortunately, the answer to that question is a resounding “No!” If what you have to say isn’t illegal, then go ahead and say it. Of course, you only have 140 characters to work with, so Twitter is no place for the long-winded. 

The sheer compactness of a typical Twitter missive means that although the content is as varied as the 
people who send it, tweets do tend to fall into a few basic categories.

Sending an update using the Twitter site

There are multiple ways you can post updates to Twitter, and you learn about most of them elsewhere in the book. However, the most common posting method is still the Twitter site itself, so run through the steps:

1.  Sign in to your Twitter account.

 2.  Click Home.

 3.  Use the large What are you doing? text box to type your 

update. As you type, the number above the right edge of the text box counts down from 140 to tell you how 
many characters you have left. There are three things to note about this countdown:

l  When the count dips below 20, the number color changes to Maroon.
1 When the count dips below 10, the number color changes to Red.

1   When the count dips below 0, the number color stays Red, but it also sprouts a negative sign, and Twitter disables the Update button, You need to get the count back to 0 or more before Twitter allows you to post.

4.  Click Update. Twitter posts the update and adds it to the feed of every person who’s following you.

Reference : wiley.com

Twitter tips--Stopping Twitter from Sending New Follower Messages


Stopping Twitter from Sending New Follower Messages,twitter tips,twitter tips and tricks,fb tips,facebook tips,facebook tips and tricks,digg tips
Stopping Twitter from Sending New Follower Messages With all these great renovations you’ve been doing, it won’t be long before people start beating a path to your Twitter door. You’ll know right away if your custom design is a hit because Twitter sends you an e-mail message every time a kind soul decides to follow you. Personally.

 I love getting these messages because it’s great to know that my tweets have a growing audience, and it also gives me a chance to check out lots of other profiles. You never know who you might come across 
and decide to follow yourself.

On the other hand, if your profile becomes quite popular, getting tons of messages from Twitter may not appeal to you. Similarly, you might be following as many people as you can handle, so you’re not interested in also following any of your new followers.

If that’s the case, then you should follow these steps to tell Twitter to stop sending you an e-mail message each time someone follows you:

 1.  Sign in to your Twitter account.

 2.  Click Settings. The Settings page appears.

 3.  Click the Notices tab.

 4.  Deselect the Email when someone starts following me check box.

 5.  Click Save. Twitter updates your profile with the new setting.


Reference : wiley.com

Twitter tips--Selecting a custom background image in Twitter


facebook tips,facebook tips and tricks,twitter tips,twitter tips and tricks,Selecting a custom background image in Twitter

Twitter tips--Selecting a custom background image in Twitter

If you want to ramp up the “wow” factor, if you want to use your Twitter profile as part of a personal 
or business branding strategy, or if you just want a Twitter home that truly reflects your style and 
personality, then you need to augment your design with a custom background image.

You might think this is just a simple matter of uploading your favorite photo, but Twitter offers several unique challenges when it comes to selecting a background image. Before I get to those, run through the steps you need to follow to apply a custom background image to your Twitter profile:

 1.  Sign in to your Twitter account.

 2.  Click Settings. The Settings page appears.

 3.  Click the Design tab.

 4.  Click Change background image.

 5.  Click Browse. If you’re using Safari, click Choose File, instead. A file selection dialog box appears.

 6.  Choose the file you want to use, and then click Open (or Choose in Safari). You can use either a JPEG or a PNG file, and the maximum size is 800KB.

 7.  If you want Twitter to tile the image to cover the background, select the Tile background check box.

 8.  Click Save Changes. Twitter updates your profile with the new background image.

Reference : wiley.com

Twitter tips--Using a solid color background in Twitter


facebook tips,facebook tips and tricks,twitter tips,twitter tips and tricks,Using a solid color background in Twitter

Twitter tips--Using a solid color background in Twitter 

The simplest customization you can make to your design is to switch to a solid color background.Swirling patterns and striking photos have their place in the world of Twitter backgrounds, but some people find them distracting. Framing your Twitter home with an attractive color lays a solid foundation for your content, and focuses your reader’s attention on your posts.

Here are the steps you have to follow to switch to a solid color background:

 1.  Sign in to your Twitter account.

 2.  Click Settings. The Settings page appears.

 3.  Click the Design tab.

 4.  If you have a predefined Twitter theme applied, click Change background image, and then click Don’t use a background image.

 5.  Click Change design colors.

 6.  Click the Background swatch. Twitter displays two color controls, The outer circle controls the base color, and the inner square controls the amount of gray in the color.

 7.  Click a spot in the outer circle to set the base color. You can also drag the small circle to set the base. When you make your choice, Twitter temporarily changes the background color so you can see the results.

8.  Click a spot in the inner square to set the gray component color. You can also drag the small circle to set the grayness. Again, Twitter temporarily changes the background color so you can see the results.

 9.  Click Save Changes. Twitter updates your profile with the new background color.

Reference : wiley.com

Twitter tips--Applying Theme Twitter Profile


facebook tips,facebook tips and tricks,twitter tips,twitter tips and tricks,Applying Theme Twitter Profile

Applying a Theme to Twitter Profile

Your fresh-out-of-the-box Twitter account sets up your pages to use a collection of colors and 
images that are the same for all new accounts:

  The page background is light blue.

  The page background shows faint cloud-like images.

  The sidebar uses a light green background.

  The sidebar border is a slightly darker green.

  The links are a darker blue.

  The text is dark gray.

Taken together, these half dozen items comprise the profile’s theme. Happily, you’re not stuck with 
the default theme. If you want to give your Twitter profile a different look, you can apply one of the 
dozen prefab themes that Twitter provides, or you can take an even more customized approach by 
choosing your own theme components.The next couple of sections take you on this theme road less traveled, but for now here are the,

steps to follow to apply a predefined Twitter theme:

 1.  Sign in to your Twitter account.

 2.  Click Settings. The Settings page appears.

 3.  Click the Design tab.

 4.  In the Select a theme area, click a theme that looks 

5.  Repeat step 4 until you find a theme that suits you.

 6.  Click Save Changes. Twitter updates your profile with the new theme.

Reference : wiley.com

Twitter tips--Setting Twitter account Picture


facebook tips,facebook tips and tricks,twitter tips,twitter tips and tricks,Setting Twitter account Picture
Setting Twitter account Picture

If the eyes are the windows of the soul, your Twitter picture is the window of your account
Sort of. To see what I mean, check out the list of Twitterers.See the picture in the lower right corner? 
That’s the generic image that Twitter displays when a user hasn’t taken the time to choose 
his or her own picture.

Of course, no one’s going to put a gun to your head to force you to put up your own picture, but that generic image is rather lame, and it tells folks that you haven’t got your act together enough to spend the couple of minutes that it takes to set your own picture. Even better, choosing your own picture is a chance to have a bit of fun.

 Most Twitterers use simple head shots of themselves, but a large percentage use something else 
entirely: a cartoon character, a caricature, an animal, a logo, or whatever. Feel free to let your imagination run a bit wild here.Once you’ve settled on an image that suits your style, 

follow these steps to add it to your profile:

 1.  Sign in to your Twitter account.

 2.  Click Settings. The Settings page appears.

 3.  Click the Picture tab.

 4.  Click Browse. If you’re using Safari, click Choose 

File, instead. A file selection dialog box 
appears.

 5.  Choose the file you want to use, and then click Open (or Choose in Safari). You can 
use either a JPEG or a PNG file, and the maximum size is 700KB.

 6.  Click Save. Twitter updates your profile with the new image.

Reference : wiley.com

Twitter tips--Filling In Twitter account Profile Details


facebook tricks,fb tips,facebook and twitter and digg tips and tricks
When you created your Twitter account, you only had to specify three things about yourself: your name, the Twitter username you preferred, and a password for your account. That made the signup procedure blessedly quick, but it doesn’t give folks much to chew on when they access your profile.

Fortunately, Twitter lets you fill in a few more details after your account is set up, including your time zone, your Web site address, a short bio, your location in the real world, and the language you prefer. Of these, your Web address, bio, and location are the most important because they appear directly on your Twitter home page (as does your real name), so anyone (even non-Twitterers) can see them.

Here are the steps to follow to fill in these profile details:

 1.  Sign in to your Twitter account.

 2.  Click Settings. The Settings page appears.

 3.  Click the Account tab.

 4.  If you want to adjust your real name, edit the Name text box. Remember that other Twitter users usually   rely on the real name to find people, so don’t be shy about using your full name (although remember that you only get 20 characters to play with here).

 5.  If you want to change the e-mail address that Twitter uses to communicate with you, edit the Email text box. Although you may be tempted to use a fake address here, stick with a legit address to ensure not only that you get notifications from Twitter, but also so you have the option of resetting your password if you
forget it (as I described in last post link).

6.  Use the Time Zone list to choose the option that most closely matches your time zone.

 7.  If you have a separate Web site or blog, use the More Info URL text box to type the address.

8.  In the One Line Bio text box, type a short description of yourself. Somewhat oddly, Twitter gives you 160 characters here; limiting this field to 140 characters would seem more in keeping with the Twitter vibe, but there you go.

Give a bit of time and thought to your Twitter bio. When people are deciding whether to follow you, they look at your recent updates, for sure, but most folks also glance at the bio to get a sense of who you are. If your bio is uninspiring, people might think your tweets will be, too. A bio that portrays a sense of whimsy or fun is always welcome in the Twitter sphere.

9.  Use the Location text box to type your city, state, country, GPS coordinates, or any combination of the four (up to 30 characters).

 10.  Click Save. Twitter updates your profile.


Reference : wiley.com

Twitter Tips- Deleting Your Twitter Account


facebook tricks,fb tips,facebook and twitter and digg tips and tricks
I have the feeling that you’re going to love Twitter, but it’s also true that microblogging isn’t for everyone. The constant pressure to answer the canonical Twitter question “What are you doing?” may simply become too much after a while. If taking a short break doesn’t help (I’m talking about a few days or even a few weeks, not a few minutes), then you can walk away and move on with your life. 

You could opt to let your account lie dormant (it is, after all, free), but if there are updates you want to get rid of, or if you don’t want new people to follow you, then you should delete your Twitter account.

Of course, it could be that you love the whole Twitter thing, perhaps even to the extent that you’ve created multiple Twitter accounts. Lots of people juggle multiple Twitter identities (I have two, myself ), but it requires lots of logging in and out, and lots of extra work updating and maintaining each account

If it all just gets to be too much, you might want to delete one or more of your accounts so you can finally get some sleep at night.


-If you need to go the multiple-account route, then I strongly suggest using a third-party tool that supports multiple Twitter accounts, such as twhirl. See Chapter 8 for a look at some of these powerful tweeting tools.-

Fortunately, unlike a lot of online services that bury their account removal features in some obscure nook or cranny of their site (or, worse, require you to call the company to have your account terminated), Twitter makes it nearly painless to delete an account

Here’s what you do:

 1.  Sign in to your Twitter account.

 2.  Click Settings. The Settings page appears.

 3.  Click the Account tab.

 4.  Near the bottom of the page, click the Delete my account link. The Delete page appears, which asks if you really want to go through with this.

 5.  Click Okay, Fine, Delete My Account. Twitter deletes your account.

Did you click the Okay, Fine, Delete My Account button and then immediately regret your rash decision? Not to worry, because Twitter actually keeps your account in limbo for six months. If you change your mind within that time, you can get your deleted account restored with almost no fuss.

 1.  Direct your nearest Web browser to http://twitter.com/account/deleted.

 2.  Use the text box to type the username or e-mail address associated with the account.

 3.  Click Restore my account. You’ll receive an e-mail message that offers a link, and you click that link to restore your account.Yes, it is really that easy, providing you restore it when your account is still in that limbo period.

Reference : wiley.com

Twitter Tips- Resetting Your Twitter Password


facebook tricks,fb tips,facebook and twitter and digg tips and tricks
Resetting Your Twitter Password Okay, so you’ve been on vacation for a couple of weeks, or your nose has been grindstone-bound while you finish off a few projects, and so you’ve been away from the Twitterverse for a bit. It happens even to the most dedicated Twitterers

You return to the login screen and, doh!, you’ve forgotten your password. You try all your old favorites, but no joy. You’re locked out of your Twitter account!Fortunately, all is not lost. You can ask the kind folks at Twitter to reset your password, which will get you back up and tweeting in just a few minutes. 


Here’s what you do:

1.  Send your Web browser to https://twitter.com/account/resend_password. The Forgot your password? page appears.

 2.  Type your Twitter username in the text box. You can also type the e-mail address that you associated with your Twitter account.

 3.  Click Reset my password. Twitter ships you an e-mail message (Subject line: “Reset your Twitter password”) that includes a link to a password reset page.

 4.  When you get the message, click the link. Your default Web browser pops up and takes you to the password reset page.

 5.  Type your new password in the New Password and Verify New Password text boxes.

 6.  Click Change. Twitter resets your account with the new password.

Reference : wiley.com

Twitter Tips- Changing Your Twitter Password


facebook tricks,fb tips,facebook and twitter and digg tips and tricks

When you forged your new Twitter account,you had to specify an account password,and Twitter is security-minded enough to rate your password on-the-fly:Weak, Good, Strong, or Very Strong. If you settled for a Weak or even just a Good rating, you might be having second thoughts and feel you’d sleep better at night with a Strong or even a Very Strong password.

Conversely, you might be wondering what’s the big whoop about a Twitter password? After all, it’s just your Twitter account. It’s not like you’re exposing your finances or national security secrets to the world (I’m assuming here you’re not the Secretary of State). 

True enough, but it’s also true that Twitter accounts have been hacked in the past, with the accounts of Britney Spears and a Twitter staffer (who was using the password “happiness,” which is about as weak as they come) being the most notorious. 
facebook tricks,fb tips,facebook and twitter and digg tips and tricks


If you’re using your real name with your Twitter account, then you definitely don’t want some malicious hacker having his way with this part of your online identity.Fortunately, changing the password for your Twitter account isn’t much harder than what you had to go through in the first place:


 1.  Sign in to your Twitter account.

 2.  Click Settings. The Settings page appears.

 3.  Click the Password tab.

 4.  Use the Current Password text box to type your existing   

   Twitter password.

 5.  Type your new password in the New Password and Verify New 

     Password text boxes.

 6.  Click Change. Twitter updates your account with the new   

   password.


Reference : wiley.com

Twitter most used social network sites for Businesses Tips and Tricks


Twitter is rapidly flattering one of the most-used social network sites for  Businesses.But what is it that makes Twitter so good for business?There are many reason;,the first would be that it is great for receiving your message  across to a lot of public. Twitter currently has around 6 million active user per  month; many are business and many are individuals. In this post I am going away to tell  you how to make the most of this site.

Twitter most used social network sites for  Businesses


When Twitter first originate, it was used by persons to keep in touch with their  friends, and to let them know what they are doing. lately, though, businesses  have exposed the potential Twitter has to produce their business.Businesses use Twitter for a couple of different reasons; to build rapport with  Prospective clients, and to raise their brand awareness.

To be winning on Twitter as a business, there are a few straightforward steps;augment your visibility. The more you tweet, the more populace are likely to follow you.The more public that follow you, the more people you can get your communication to.When  you first join Twitter, you will have to generate a profile. Think about the thought your profile has on people visiting it; is it boring, or is it something that intrigues the viewer, and make them want to receive your tweets?

When an important person send you a  message or tweets relating to you, don’t ignore it.This is exactly what you want from  Twitter; a chance to interact with someone. Many populace make the mistake of just tweeting and not interact with other people. You shouldn’t do this; one of the most important reasons for you combination Twitter is to interact with not only persons, but other businesses as well NEVER tweet direct sales messages, such as ‘visit this site to buy’ You want to redirect populace to your site, and your site will do the selling for you.

Don’t just tweet about yourself; tweet about attractive articles you have read on the internet, and comprise a link to it Establish yourself as an specialist – if people imagine of you as an expert in your engineering, you are going to be the first human being that they ask regarding a problem they may have. They also increases the chance that they will Want to do business with you in the future.And there you have it – a few instructions to increase your achievement on Twitter. In my next post, I am leaving to give you a few tips to using Facebook for your business.

Don’t miss it! If you contain any more tips for Twitter, leave a comment.

Reference : twitterapplicationssite.com
http://learnfbtips.blogspot.com

Download Facebook album’ extension for Google Chrome

Facebook has become one of the most popular website where people share Although you are provid with the option to download the photos that were uploaded the option provided only allows you to download the photos one by one which is quite tedious.If you want to download a photo album as a whole from Facebook.

You can use ‘Download Facebook album’ extension for Google Chrome. You can use the extension to download all the photos inside an album at one go.

Download Facebook album


All you need to do is to just install the extension (through the link provid below).open a Facebook album page
and click on the button for the extension that can be found in the toolbar (the button for the xtension will
appear after installation).When you clicked on the “Download Facebook album’s photos” icon in the toolbar, you will be provid with all the

photos in a new tab for you to view.  If you want to save all the photos, just press “Ctrl+S’ and select whole
pages”. The photos will be saved in your PC under a new folder.


Download Facebook album

My friend wants to Download Facebook album his/her friend's , so I write a tool for his/her.

Usage:
1. Link to the album on your facebook page.
2. Click the "Download FB phtos" Icon.
3. You will see all photos on a new tab.
4. Press "Ctrl+S" and select "Save whole pages".
5. Great! You will see a folder including all the photos in this album.


Reference : avirtualexit.com


How to earn money online without any investment:


earn money online,how to earn money from internet,earn without investment
Earn money from YouTube money making program. YouTube has money making programme called YouTube partner program. Many YouTube partners make thousands of dollars from YouTube. Create and upload your original videos in YouTube and peoples watch the videos you get money from YouTube via papal or direct check. Apply for a YouTube partner program and make money. YouTube is a good way to make money online. Every time your videos watched by anyone you get money from YouTube. YouTube money making program is the one of the best money making program in online.


Make money from facebook by sponsored sharing. In facebook they are many money making opportunities are available. Make money from facebook by sponsored sharing is a good idea. First you must create a page and achieve maximum like for this page. If your page like reach a minimum level (eg: your page got 25000 likes) go to fiverr.com and post a advertisement “i will share your link in my fcebook page contain 25000 likes for $5”. Customers automatically come and you get money. Sponsored sharing i s a good idea to make money from facebook.

Make money from online survey jobs. Online survey jobs are help to make money online easy. Online survey jobs are the best way to make money online. The concepts of online survey jobs is companies pays a large amount of money to research market, business etc, survey companies take the task and research it in peoples. Survey companies pay a little amount of money to online survey takers. Online survey jobs are very easy to participate and make money online. I think globaltestmarket.com is a genuine online survey job provider.

Canada Drugs

CanadaDrugCenter.com is America's choice for safe and affordable prescription and non-prescription medications. Our Canadian online pharmacy service can provide you with savings of up to 90% on all your medication needs. Through the Canada Drug Center online pharmacy service, we help connect you to a fully licensed pharmacy that can fill your medication order at the lowest possible price.

All medication orders are filled and shipped by a fully licensed pharmacy and delivered directly to your doorstep.

We, at Canada Drug Center, would like to share with you some insight into our company and the people who operate Canada Pharmacy.

You will see for yourself that we are a dedicated and committed team of professionals whose main goal is the well being of our patients.

At CanadaDrugCenter.com, we guarantee the lowest prices on all popular brand and generic medications.

We will match or beat all competitor advertised prices. Call us today and start saving money on all your medications.

Canada Drug Center's customer care center is located in Richmond, British Columbia, Canada. Once we receive your order, it will be reviewed by qualified professionals and your medications will be dispensed and shipped from our licensed pharmacy.

Our Canadian pharmacy is approved by the Canadian International Pharmacy Association (CIPA). CIPA is the only organization in Canada that has created a licensure program to certify online Canadian Pharmacies that provide pharmacy services to international customers.

Canada Drug Center has been subject to an assessment process in order to be licensed by CIPA. We proudly display CIPA certification as a mark of trust and reliability.

We offer top-quality medications at low prices. We do that by filling your prescription medications with less expensive pharmacy drugs from our licensed Canadian pharmacy and international pharmacies


Reference:Canada drugs


TRICK-- Place Facebook Chat On Firefox Sidebar

trick in facebook,facebook background,manage facebook chat,chat with friend,trick manage facebook,block incoming email,facebook friends photos,gmail and yahoo,facebook fullpost display,friends photos displayed,transfer orkut photos,trick in facebook,facebook background,manage facebook chat,Create your business page on Facebook

Facebook Chat is cool, at least it allows you to send instant messages to online Facebook contacts. However I’m not really a fan of the chat bar being at the bottom of the page,what if I’ve left Facebook but still wants to remain chatting with my Facebook contacts? If you are using Firefox, you can place the Facebook Chat at the sidebar.

Step 1

Look for Bookmarks on the top navigation. Select Organize Bookmarks.

trick in facebook,facebook background,manage facebook chat,chat with friend,trick manage facebook,block incoming email,facebook friends photos,gmail and yahoo,facebook fullpost display,friends photos displayed,transfer orkut photos,trick in facebook,facebook background,manage facebook chat,Create your business page on Facebook


Step 2

Click New Bookmark... tab and enter the following:

    1--Name: Facebook Chat
    2--Location: http://www.facebook.com/presence/popout.php
    3--Check Load this bookmark in sidebar.

trick in facebook,facebook background,manage facebook chat,chat with friend,trick manage facebook,block incoming email,facebook friends photos,gmail and yahoo,facebook fullpost display,friends photos displayed,transfer orkut photos,trick in facebook,facebook background,manage facebook chat,Create your business page on Facebook


Step 3

Launch the Firefox sidebar, click Facebook Chat and start chatting with your Facebook contacts within Firefox.

trick in facebook,facebook background,manage facebook chat,chat with friend,trick manage facebook,block incoming email,facebook friends photos,gmail and yahoo,facebook fullpost display,friends photos displayed,transfer orkut photos,trick in facebook,facebook background,manage facebook chat,Create your business page on Facebook


Reference : avirtualexit.com

TRICK--Create your business page on Facebook Registration – So easy a caveman could..well, you get the point.


There are two ways to create your business page on Facebook; in conjunction with your personal profile, or as a standalone page. This guide will explain how to set up both.

"I am already a Facebook user, but I want a page for my business”

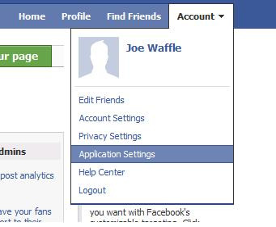
To add a business page to your existing profile simply log in and look for the account tab in the upper right hand corner of the page. The drop down menu for this tab will have a link for Application Settings.

trick in facebook,facebook background,manage facebook chat,chat with friend,trick manage facebook,block incoming email,facebook friends photos,gmail and yahoo,facebook fullpost display,friends photos displayed,transfer orkut photos,trick in facebook,facebook background,manage facebook chat,Create your business page on Facebook

Under the application settings, look for another drop down menu on the right side and click “Authorized”. Once selected, Facebook Ads and Pages should now appear at the top of the list.

trick in facebook,facebook background,manage facebook chat,chat with friend,trick manage facebook,block incoming email,facebook friends photos,gmail and yahoo,facebook fullpost display,friends photos displayed,transfer orkut photos,trick in facebook,facebook background,manage facebook chat,Create your business page on Facebook

Click it and look for the “Create Page” tab. From now on, when you log into your personal account, Facebook Ads and Pages will be an easily accessible option located on the navigation column underneath your profile picture. From here, just follow the steps for first time Facebook users.

trick in facebook,facebook background,manage facebook chat,chat with friend,trick manage facebook,block incoming email,facebook friends photos,gmail and yahoo,facebook fullpost display,friends photos displayed,transfer orkut photos,trick in facebook,facebook background,manage facebook chat,Create your business page on Facebook


“Brand New Users – Set up a Business Page Like This”

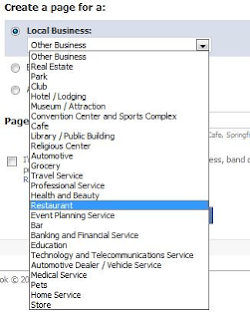
Start by visiting Facebook.com. On the right side of the page you’ll see an area where you can sign up for a personal Facebook. Underneath the text fields there is a small link that reads “Creating a page for a celebrity, band or business”. Click this link and select the tab that best describes the nature of your business.
1

trick in facebook,facebook background,manage facebook chat,chat with friend,trick manage facebook,block incoming email,facebook friends photos,gmail and yahoo,facebook fullpost display,friends photos displayed,transfer orkut photos,trick in facebook,facebook background,manage facebook chat,Create your business page on Facebook

2

trick in facebook,facebook background,manage facebook chat,chat with friend,trick manage facebook,block incoming email,facebook friends photos,gmail and yahoo,facebook fullpost display,friends photos displayed,transfer orkut photos,trick in facebook,facebook background,manage facebook chat,Create your business page on Facebook

3
trick in facebook,facebook background,manage facebook chat,chat with friend,trick manage facebook,block incoming email,facebook friends photos,gmail and yahoo,facebook fullpost display,friends photos displayed,transfer orkut photos,trick in facebook,facebook background,manage facebook chat,Create your business page on Facebook

Choose from a variety of options, including: Automotive, Café, Pets and Store. If none of the options are a fit, go with “Other Business”. Different settings provide unique information fields you’ll be able to fill out later which pertain to the specific nature of the business category. Make sure whatever you select is a
classification you’re happy with; at this time Facebook does not allow page owners to edit this setting.

4

trick in facebook,facebook background,manage facebook chat,chat with friend,trick manage facebook,block incoming email,facebook friends photos,gmail and yahoo,facebook fullpost display,friends photos displayed,transfer orkut photos,trick in facebook,facebook background,manage facebook chat,Create your business page on Facebook

In the name field type the name of your business. Wait, not so quickly! This field is pretty important. Pay special attention to wording and spelling as this will be part of how people find you and you will not be able to edit it later. If you’re the owner of “Joe’s Waffle Shack” you don’t want to go down in Facebook history as
“jois waffle shck”. This is not the same as your vanity URL, which we’ll discuss later.

Click the box underneath the field to delay having the page published right away.We’ll get to the publishing part later. This will give you a chance to look things over before making your site “live”.

 Though you won’t be able to edit your selections if you find a mistake, you can always start over. Better to start over before you’re published, than after you have thousands of fans, or the profile is more developed.

Finally, finish the security prompts to prove you’re not an information seeking robot and click “Create Page”. Hold on, we’re not done yet. The next page will ask you if you already have a personal Facebook page. Click whichever applies. If you do not have a Facebook account, proceed to fill in the required information.
After a quick email confirmation, you’ll be redirected back to Facebook and see something like this.

"Behold the glory of a fresh Facebook page!Congratulations, the hardest part is over"

Okay, so maybe it isn’t so glorious yet. But you’re on the right track. Just a few more steps before you’re a (viral) marketing power house.Before we take your page to the next level, it’s important to note that you should stay away from two of the tabs in the upper right corner before you have any fans. “Create Your Profile” and “Settings” are incorporated in the interface for personal Facebook pages and will convert your business page to a personal profile

f those tabs are filled out and activated. All of the editing for your business page can be done either from the main page, or by clicking on the “Facebook” logo in the upper left corner. Clicking the Facebook logo will toggle between your page view and the administrative panel of your site.Now, let’s get to customizing! 


Reference : avirtualexit.com